Learn how to connect a Raspberry Pi Pico W to Slack and create an interactive Slack bot that can send and receive messages. This tutorial is courtesy of our good friend Sandeep Mistry, Principal Software Engineer at Arm.

Slack is a popular cloud-based instant messaging platform used by millions of people every day for business and community communications. In addition to human-to-human messaging, Slack provides an API for developers to extend the built-in functionality via apps and bots.
This guide will cover how a Raspberry Pi Pico W board can use the Slack API to send and receive messages using its built-in Wi-Fi® connectivity. To keep things simple the guide will focus on controlling the board’s built-in LED. When the Raspberry Pi Pico W is mentioned:
- With the text “LED on” it will turn the built-in LED on, then respond with a confirmation message.
- With the text “LED off” it will turn the LED built-in off, then respond with a confirmation message.

You can extend the example code and:
- Control external LEDs or actuators
- Report data or alerts from sensors
Hardware
The Raspberry Pi Pico W board is based on the Raspberry Pi RP2040 microcontroller (MCU), which contains a dual-core Arm Cortex-M0+ processor. The board is also equipped with an Infineon CYW43439 chip that is used for 2.4GHz Wi-Fi and Bluetooth communications and contains a Arm Cortex-M3 processor.

Software
The Raspberry Pi Pico W can run applications developed in MicroPython and C (using the pico-sdk). I’ll demonstrate how both programming languages can be used to create an application that communicates with Slack.
The MicroPython and C code used in this project can be found on GitHub. You can download it using git:
git clone --recurse-submodules https://github.com/ArmDeveloperEcosystem/example-of-a-slackbot-for-pico-w.gitIf you are unfamiliar with git, a zip file version can also be downloaded and extracted.
Application Overview
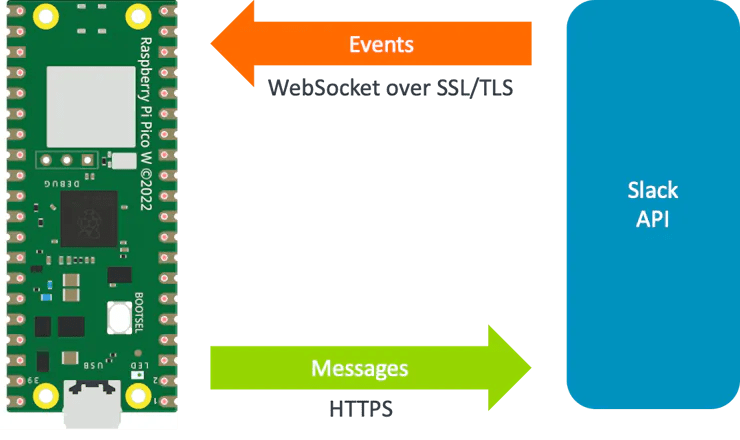
Slack’s chat.postMessage API will be used to send messages from the board to a Slack channel. Slack provides an events API for apps and bots to respond to activities on Slack; since the board is not directly accessible from the public internet, a public HTTP webhook cannot be used, so instead we must rely on Slack’s Socket Mode. The Socket Mode enables apps and bots to receive events using a dynamic WebSocket connection. The URL for the dynamic socket connection can be retrieved using Slack’s apps.connections.open API.
A Slack app token is required to receive events, and a Slack bot token is required to send messages. The next section includes a step-by-step guide on how to configure Slack and create both tokens.
Configuring Slack
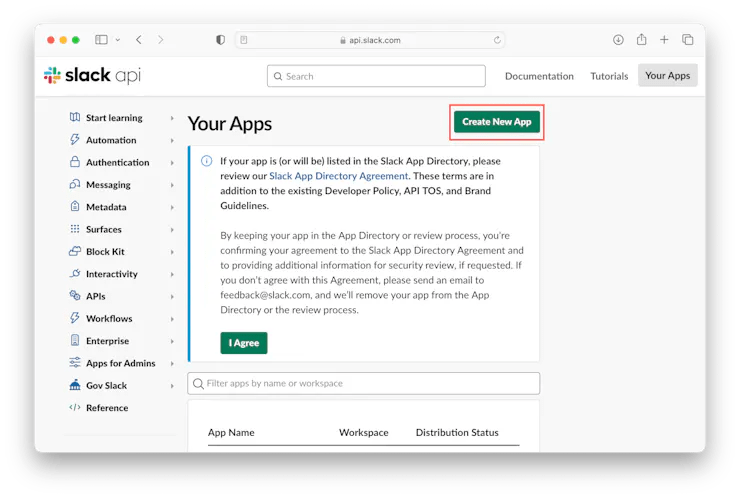
In a web browser, visit https://api.slack.com/apps and log in with your Slack credentials. Click the “Create New App” button.
Next, click on the “From scratch” option.

Enter a name for your application (for example “Pico W”), select a workspace for the app, and click the “Create App” button.

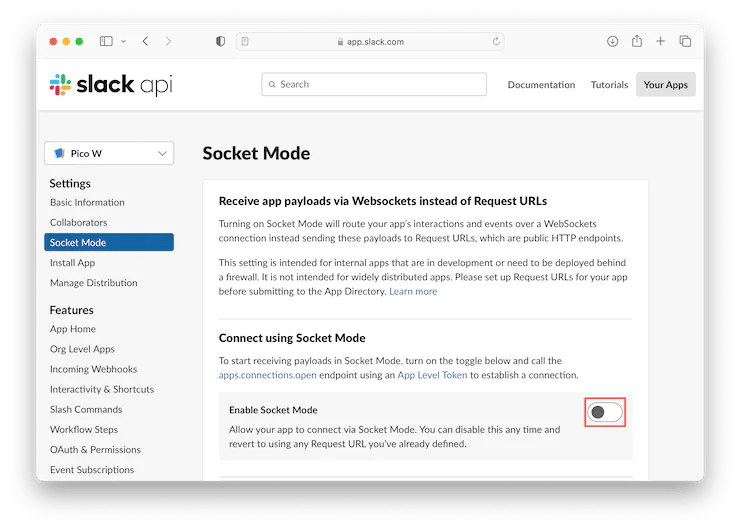
Click the “Socket Mode” section on the left and click the switch to “Enable Socket Mode”.
Enter a “Token Name” for the app-level token, for example “Pico W app”, then click the “Generate” button.

The app-level token is generated and displayed. Copy the value and save it for future reference, then click the “Done” button.

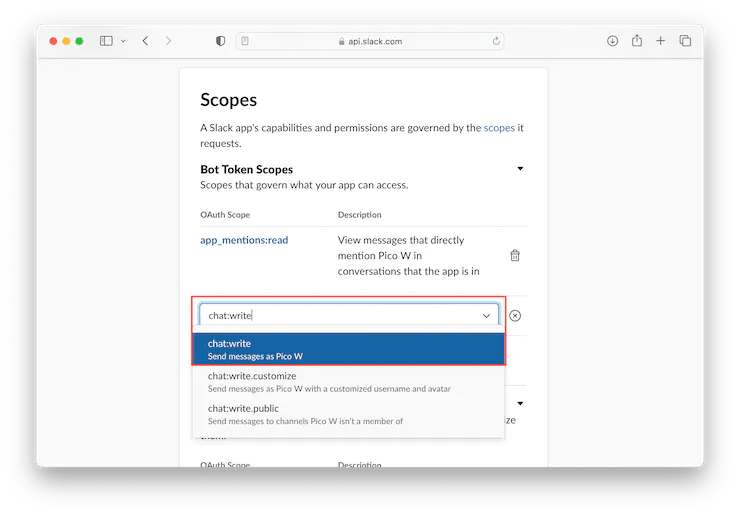
Click on the “OAuth & Permissions” section on the left, scroll down to the “Scopes” section, and click the “Add an OAuth Scope” button.

Add “app_mentions:read” as permission.

Add “chat:write” as permission.
Click the “Event Subscriptions” section on the left then click the switch to “Enable Events”.

Expand the “Subscribe to bot events” section and click the “Add Bot User Event” button.

Select “app_mention”.

Click the “Save Changes” button in the bottom right.

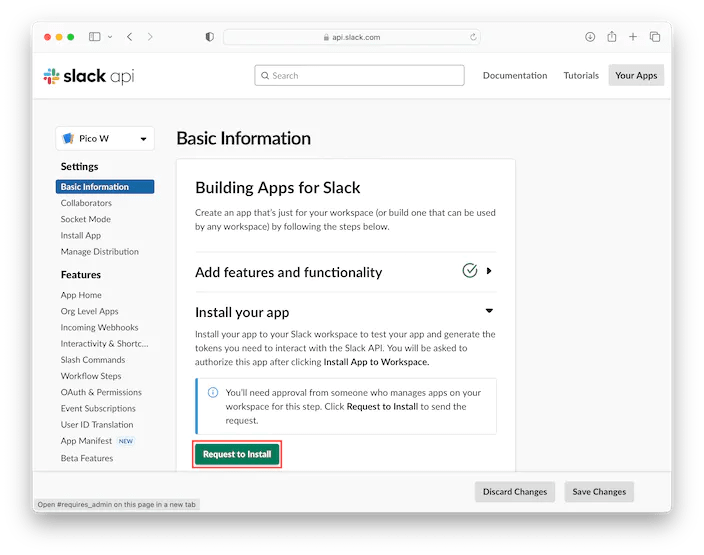
Click the “Basic Information” section on the left and click the “Request to Install” button.
Fill in a “Short description”, select “Background color”, and click the “Save Changes” button.

The workspace admin can approve the application. Then go to the “Basic Information” section and click the “Install to Workspace” button.

Once it is installed, click the “OAuth & Permissions” section on the left, scroll to the “OAuth Tokens for Your Workspace”, section, then copy the “Bot User OAuth Token” value and save it for future reference.

Now you have an app-level token value and a Bot User OAuth Token value for a Slack application that can be used on a Raspberry Pi Pico W board.
MicroPython-based Slack bot
MicroPython provides a Python 3 implementation for many Arm Cortex-M based microcontrollers, including the Raspberry Pi RP2040 on the Raspberry Pi Pico W board.
The Thonny IDE will be used to install MicroPython and upload code to the Raspberry Pico W board. Download the operating system (OS)-specific version of Thonny for your computer from the Thonny home page. At the time of writing this guide, Thonny 4.1.2 was the latest release.

While holding the white boot button on the Pico W board, plug in a micro USB B cable to the board and then plug the other end of the cable to your computer. If done correctly, a new RPI-RP2 boot volume will appear on your computer:
Open the Thonny application and click the “Local Python 3 – Thonny’s Python” label on the bottom right-hand side of the window:

Then click on the “Install MicroPython…” menu option:

Select “Raspberry Pi – Pico W / Pico WH” as the variant, then click the “Install” button to start the installation. Once the download and installation are complete, click the “Close” button.

Click the “Local Python 3 – Thonny’s Python” label on the bottom right-hand side of the window, then click the “MicroPython (Raspberry Pi Pico)…” menu option to select the board.

Click the “View” menu, then click “Files”.

Navigate to the micropython folder inside of the example-of-a-slackbot-for-pico-w folder where the code from GitHub downloaded on your computer.

While pressing the shift key on your keyboard, select all the files in the “This computer” section. Then right-click and select “Upload to /” to upload the files to the Pico W board.

Open the config.py file on the Raspberry Pi Pico W board, and fill in your Wi-Fi network’s SSID and password, as well as the Slack app and bot tokens configured earlier.

Open the main.py file on the Raspberry Pi Pico W board, and then press the green play button to run the application. If everything is configured correctly, the board will now connect to your Wi-Fi network and then to Slack.

Scroll down to the Testing the application section for steps on testing.
C-based Slack bot
For the C version, the following libraries will be used alongside the pico-sdk:
- FreeRTOS kernel – to provide a Real-time Operating System (RTOS) for the networking stack
- lwIP – for TCP/IP communications
- Mbed TLS – for TLS communications
- coreHTTP – for the HTTP client
- cJSON – for parsing and serializing JSON data
Set up your computer with Raspberry Pi’s Pico SDK and required toolchains. See the Getting started with Raspberry Pi Pico guide for more information.
Section 2.1 of the guide can be used for all operating systems, followed by the operating system-specific section:
- Linux: Section 2.2
- macOS: Section 9.1
- Windows: Section 9.2
In a terminal window, set the PICO_SDK environment variable:
export PICO_SDK_PATH=/path/to/pico-sdkChange directories to where the example code was downloaded, then change directories to the pico-sdk folder:
cd path/to/example-of-a-slackbot-for-pico-w

cd pico-sdk
Create a build directory and change directories to it:
mkdir build

cd build
Run cmake with your Wi-Fi SSID and password, plus your Slack app and bot tokens, then run make to compile the application:
cmake .. -DPICO_BOARD=pico_w -DWIFI_SSID="" -DWIFI_PASSWORD="" -DSLACK_BOT_TOKEN=""

make
Hold down the BOOTSEL button on the Pico board, while plugging the board into your computer with a USB cable.
Copy the picow_slack_bot.uf2 file to the mounted Raspberry Pi Pico boot ROM disk:
cp -a picow_slack_bot.uf2 /Volumes/RPI-RP2/.Use a serial monitor application such as screen to view the USB serial output from the board, replacing /dev/cu.usbmodem0000000000001 with the path of your board:
screen /dev/cu.usbmodem0000000000001If everything is configured correctly, the board will now connect to your Wi-Fi network and then to Slack.

Read on to the next section, Testing the application, for steps on testing.
Testing the application
Open Slack on your computer and create a new channel for testing. Enter @ in the message input window, then click the green button or press return to send.
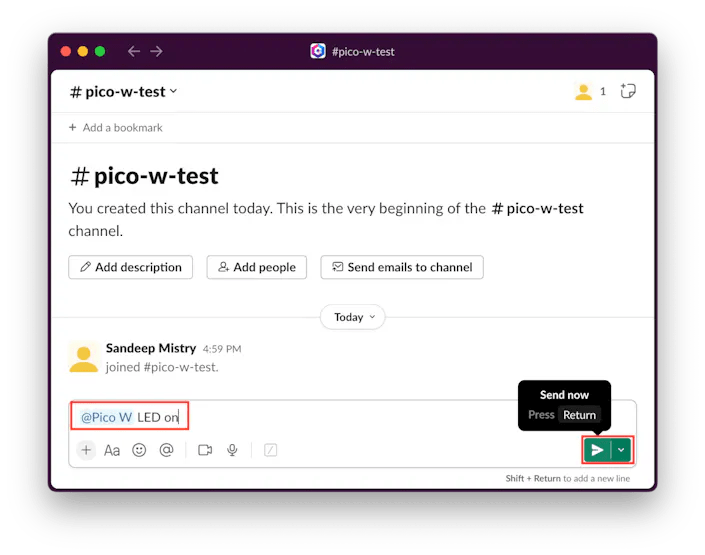
Since the Pico W is not in the channel, you will be prompted to add them. Click the “Invite Them” button.

After being invited, the board will receive and handle the message by turning on the LED and then replying to the message. You can also try sending an @ message to turn the LED off.

Conclusion
This guide covered how a MicroPython and C application running on the Arm Cortex-M0+ -powered Raspberry Pi Pico W board can send and receive messages over Wi-Fi to Slack using the Slack API.
The example application code could receive a notification from Slack when it was mentioned and process the message text to control the board’s on-board LED, followed by replying to the message with the current status of the LED.
You can try this yourself on your own Raspberry Pi Pico W board. Then build upon the example code and extend Slack to the physical world by connecting more LEDs or actuators to the board, or by connecting additional sensors of which the values get reported to Slack.
Fritzing

Code
All the code is available in this public GitHub repo.


