This tutorial will show you how to run Nextcloud on your Ubuntu device.

Nextcloud is a popular open-source software allowing you to set up your own cloud file hosting service right from your Ubuntu device.
It sports many pieces of functionality offered by cloud services like Google Drive, Dropbox, Office 365, and more. The most significant advantage of Nextcloud over these is that you remain in full control of your data as you will be hosting it.
Nextcloud has numerous applications that make synchronizing files between your devices a breeze.
Setting up Nextcloud on Ubuntu is a relatively straightforward process but will take a little bit of patience. Throughout the following steps, we will run you through all the steps to get this file hosting service up and running.
Preparing your Ubuntu Device for Nextcloud
Within this section, we will walk through all the steps to prepare your Ubuntu device to run the Nextcloud cloud service.
The three major software pieces we will focus on in this section are installing a webserver, PHP, and a database server.
Preparing Ubuntu
1. Before we get started, we should ensure that you have the latest version of the package list cache and update any out-of-date packages.
You can perform both of these tasks using the following two commands within the terminal.
sudo apt update
sudo apt upgrade
Installing a Webserver for Nextcloud on Ubuntu
2. To view the Nextcloud interface, you must install a web server on your Ubuntu device.
For this tutorial, we will focus on using Apache, as it is the web server recommended by the Nextcloud team.
Installing Apache on Ubuntu is as straightforward as using the following command within the terminal.
sudo apt install apache2You can verify that the web server is installed and running by visiting your Ubuntu device’s IP address.
3. With Apache2 now installed, we need to ensure the Apache modules required by Nextcloud are all enabled.
You will want to run the following commands within the terminal to enable each of these modules.
sudo a2enmod rewrite
sudo a2enmod env
sudo a2enmod headers
sudo a2enmod dir
sudo a2enmod mime
Setting up PHP on Ubuntu for Nextcloud
4. Nextcloud often relies on newer PHP versions to maximize its functionality and performance.
Depending on your Ubuntu version, you may need to add a 3rd party repository to access these newer versions.
Before proceeding to the next step, we recommend following our Installing PHP On Ubuntu Guide. You will only need to “Adding the PHP PPA to Ubuntu” section before returning.
5. Once you have the third-party PHP repository set up, we can move on to installing the version of PHP Nextcloud recommends.
To install all of the PHP modules Nextcloud needs to run on Ubuntu, you need to use the following command.
sudo apt install php8.1 php8.1-gd php8.1-sqlite3 php8.1-curl php8.1-zip php8.1-xml php8.1-mbstring php8.1-mysql php8.1-bz2 php8.1-intl php-smbclient php8.1-imap php8.1-gmp php8.1-bcmath php8.1-imagick libapache2-mod-php8.16. After installing PHP, we will need to restart Apache so that it becomes aware of the newly installed module.
You can restart the Apache web server by using the following command.
sudo systemctl restart apache2Installing a SQL Server for Nextcloud
7. The final piece of software we need to install to run Nexcloud on Ubuntu is a database server.
Before continuing, please follow our tutorial on installing MariaDB on Ubuntu. This guide covers installing the database server and completing some initial configuration.
8. Once you have MariaDB installed, you can safely proceed to the next step.
Setting up Nextcloud on Ubuntu
At this point, we should now have everything we need to set up and run Nextcloud on Ubuntu.
All we need to do now is create a database for Nextcloud to store its data, create a virtual host for Apache, and finally install Nextcloud itself. While this may sound like a lot, these steps won’t take us very long to complete.
Creating a Database for Nextcloud
1. Thanks to us installing MariaDB earlier in this tutorial, we can easily create a database for Nextcloud to use.
To begin creating this database, you will want to open up the SQL command line tool using the following command.
sudo mariadb2. With the SQL client now open, we can use the following command to create a SQL database for Nextcloud on Ubuntu.
We will call this database “nextclouddb“, but you can name it whatever you want.
CREATE DATABASE nextclouddb;3. With the database created, we can now create a SQL user that will be used to interact with the database.
We can create a user with the name “nextcloudusr” by using the command below. Ensure you replace “[PASSWORD]” with a password of your choice. This password should be something secure.
CREATE USER 'nextcloudusr'@'localhost' IDENTIFIED BY '[PASSWORD]';4. Even though we have created an SQL user for Nextcloud to use on Ubuntu, it currently has no permission to access the database we made.
You will want to run the following command to grant this new user all privileges on our “nextclouddb” database.
GRANT ALL PRIVILEGES ON nextclouddb.* TO 'nextcloudusr'@'localhost';5. Since we have changed the privileges table, we will need to use the following SQL command to flush the table.
If we don’t flush the table, MariaDB will be unaware of our new user and its new privileges.
FLUSH PRIVILEGES;6. With the user and database created, we can now continue installing Nextcloud on Ubuntu.
To exit the SQL command line interface, you want to type in the following.
EXIT;Downloading Nextcloud to Ubuntu
7. Before downloading Nextcloud to our Ubuntu system, we will first change to the “/var/www/” directory.
This is the default directory where Apache serves files from on Ubuntu.
cd /var/www/8. Once we are in the correct directory, we can now use the wget command to download the latest release of Nextcloud to our device.
Downloading this file is as straightforward as running the following command.
sudo wget https://download.nextcloud.com/server/releases/latest.tar.bz29. When your device has finished downloading the Nextcloud archive, we can use the tar tool to extract the archive we just downloaded.
To extract the archive, run the following command within the terminal.
sudo tar -xvf latest.tar.bz210. We now need to create a directory where Nextcloud will store all of its data by default.
Don’t worry; we can change this before using Nextcloud, but it helps to have the default location setup just in case.
To create this default data directory, we will use the mkdir command as shown below.
sudo mkdir -p /var/www/nextcloud/data11. With the directory created, we need to ensure all directories and files within the “/var/www/nextcloud” directory are owned by the “www-data” user and group.
The easiest way to do this is to use the chown command and its recursive option, as shown below.
sudo chown -R www-data:www-data /var/www/nextcloud12. The final thing we need to do with our new installation of Nextcloud is changing the permissions for our new data directory.
Using the chmod command, we are allowing the owner user (www-data at this point) full rights over the directory. We are then giving the group read and execute privileges for the new directory.
sudo chmod 750 /var/www/nextcloud/dataConfiguring PHP
13. With PHP now installed, we will need to adjust some of its settings so that it can run Nextcloud smoothly.
To begin editing the configuration file for PHP 8.1, you need to use the command below.
sudo nano /etc/php/8.1/apache2/php.iniYou will need to find and adjust several different settings within this file. When using the nano text editor, you can use CTRL + W to search the file.
14. The first setting we need to change is the max execution time. This is how long PHP will let a script run before terminating.
max_execution_time = 30Once you find the option above, replace it with the one below.
max_execution_time = 360015. The maximum input time is the next setting we want to change. By increasing this setting, we allow it to spend more time processing data that has been sent.
max_input_time = 60Update that setting to match the value we defined earlier.
max_input_time = 360016. The memory limit setting will also need to be increased so that PHP can consume more memory. Nextcloud can be quite memory intensive, especially when dealing with large uploads.
memory_limit = 128MFor this guide, we will increase the memory from the default value to 512 megabytes.
memory_limit = 512M17. By default, PHP will have the max upload size set incredibly low, so we will also want to increase this. Nextcloud won’t be an excellent fit for your Ubuntu system if you can only upload tiny files.
upload_max_filesize = 2MChange the value to the one below to increase the maximum file size to 10 GB.
upload_max_filesize = 10G18. When adjusting the max upload file size, you need to increase the max post size. Otherwise, PHP won’t be able to handle these larger files.
post_max_size = 8MAfter adjusting the value, the setting should look like what we have shown below.
post_max_size = 10G19. Once you have finished making these changes to the config file you can save and quit by pressing CTRL + X, followed by Y, then the ENTER key.
Running Nextcloud Behind SSL
20. You should run web software like Nextcloud under an encrypted connection to ensure your data remains private and secure.
Let us start by enabling the SSL module within Apache by using the following command.
sudo a2enmod ssl21. Since we haven’t received a signed certificate from an authority just like Let’s Encrypt, we will rely on a self-signed certificate for now.
One of the downsides of a self-signed certificate is that the web browser won’t be able to validate the certificate and will throw a warning when you visit your Nextcloud installation.
Enable the default SSL certificate by using the command below.
sudo a2ensite default-sslConfiguring Apache to Run Nextcloud
22. We can start creating the configuration file for Apache so that you can access your new Nextcloud installation.
To begin writing this file, use the command below within the terminal.
sudo nano /etc/apache2/sites-available/nextcloud.conf23. We have two options on what you can add to this file to configure Apache for Nextcloud on your Ubuntu device.
The first option will run Nextcloud so that it is accessible on any domain / IP address of your device by browsing to “/nextcloud“.
The other option is to set up Nextcloud so that you can access it through your chosen domain name. For example, you could access Nextcloud through a domain such as “nextcloud.pimylifeup.com“.
Running Nextcloud under a Directory
To have Nextcloud accessible from your Ubuntu service in a specific directory, you will want to use the following configuration.
For example, to access Nextcloud by going to your server’s IP address followed by “/nextcloud” you would use the configuration below.
Alias /nextcloud "/var/www/nextcloud/"
Dav off
Running Nextcloud on a Specific Domain Name
To run Nextcloud under a specific domain name, you will want to use the configuration we have shown below.
Ensure you replace “your.domainname.com” with the domain name you want your Nextcloud installation to be accessible from.
DocumentRoot /var/www/nextcloud/
ServerName your.domainname.com
Dav off
24. Once you have finished writing in the file, you can save and quit by pressing CTRL + X, Y, and finally the ENTER key.
25. With the configuration file created, we need to use the following command to enable it.
sudo a2ensite nextcloud.conf26. Even though we enabled the Nextcloud configuration on our Ubuntu device, we will still need to reload the Apache service.
This service can be restarted by using the command below in the terminal.
sudo systemctl reload apache2Completing the Setup of Nextcloud on Ubuntu
To complete the setup of your new Nextcloud installation on your Ubuntu device, you will need to utilize your favorite web browser.
The final installation steps are all completed through Nextcloud’s web interface.
1. To begin configuring Nextcloud, you must go to your Ubuntu device’s IP address within your web browser.
Alternatively, if you have configured a domain name, you will want to go to that in your web browser instead.
If using an IP address, you will likely want to go to the following address. First, ensure you replace “[IPADDRESS]” with the IP of your device.
https://[IPADDRESS]/nextcloudIf you don’t know the IP address of your device, you can follow our guide on getting the IP address of your Ubuntu device using several different methods.
2. Upon loading the Nextcloud web interface for the first time, you will be asked to complete some final setup steps.
- You will want to start by setting the username you want to use to log in to the Nextcloud web interface.
- Next, you should set a secure password for this new account. As the first user is an admin, you must keep this secret.
- The third option that needs to be set is the data directory. This directory is where Nextcloud will save all of your uploaded files on your Ubuntu system.
- When configuring the database, you need to ensure that you have the “
MySQL/MariaDB” option set. - You must now set the username for the database user. If you have been following this tutorial, you will want to use “
nextcloudusr“. - Now type in the password for your database user. You will have set this password earlier on in the guide.
- Finally, if you used the commands we utilized in this tutorial, type in the database name as “
nextclouddb“. - With all the settings filled out, click the “
Install” button to continue.

3. You now successfully have Nextcloud up and running on your Ubuntu system.
While you can start putting the web storage technology to use, there are some further changes that you can make to improve your experience.

Improving the Nextcloud Experience on Ubuntu
This section will cover additional steps you can take to improve the experience of Nextcloud on your Ubuntu device.
Setting up a Cron Job Task
By default, Nextcloud will be configured on Ubuntu only to process background tasks while a user is using the web interface.
While this works fine if you constantly view the web interface, it is problematic when you take time away from the interface background requests stop getting processed.
To work around this, you can add a cron job that ensures background tasks are continually processed.
1. Since the task needs to be run under the “www-data” user, we will need to run the following command to edit that specific user’s cron tab.
To learn more about this, read our guide on cron jobs in Linux.
sudo crontab -u www-data -eIf you are prompted to select which text editor you want to use to edit the file, we highly recommend using the nano text editor.
2. You will want to add the following line to the bottom of the file.
This line tells your Ubuntu system to run Nextcloud’s “cron.php” file every 5 minutes.
*/5 * * * * /usr/bin/php /var/www/nextcloud/cron.php3. With the changes made to your cron table, you can save and quit by pressing CTRL + X, followed by Y, then the ENTER key.
4. With the cron job now set up, we will need to change a setting within the Nextcloud web interface.
With the web interface open, click the user profile picture in the top right corner of the page (1.).
Next, click the “Administrative settings” option (2.).

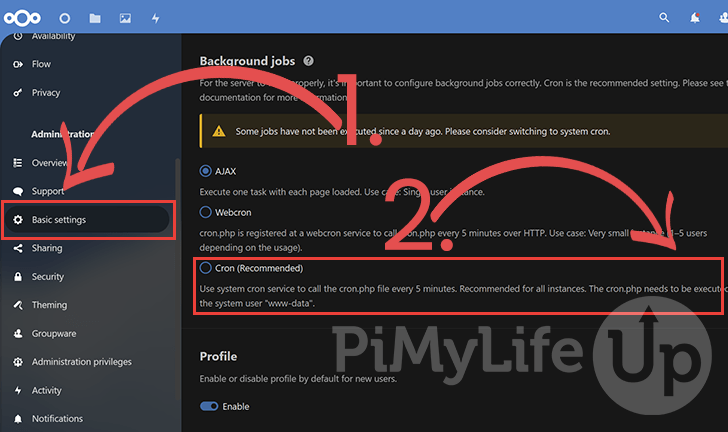
5. Now that we are on the “Administrative settings” page, you will want to change to the “Basic settings” (1.) screen.
On this screen, you want to look under the “Background jobs” header and choose the “Cron (Recommended)” option (2.).
You may be prompted to re-enter the password for your admin account for this setting to work.
Enabling Pretty Links for Nextcloud
By default, Nextcloud is configured on Ubuntu with links that start with “index.php“. However, it is possible to remove this by using the “pretty links” feature.
1. You can edit the Nextcloud configuration file by using the following command within the terminal.
sudo nano /var/www/html/nextcloud/config/config.php2. You will want to find the following line within this file.
'overwrite.cli.url'Once found, you will want to add one of the following lines underneath it. This option allows you to tell Nextcloud what to replace “index.php” with.
If you are running Nextcloud under a directory, you will want to use the following line.
'htaccess.RewriteBase' => '/nextcloud',
Alternatively, if you are running Nextcloud under its own domain name, you will want to use the following.
'htaccess.RewriteBase' => '/',3. With this change to Nextcloud’s config file, you can save and quit by pressing CTRL + X, followed by Y, then ENTER.
4. For this change to take effect we will need to use the following command to tell Nextcloud to update the “.htaccess” file
sudo -u www-data php /var/www/nextcloud/occ maintenance:update:htaccess
Conclusion
At this point in the tutorial, you should now have Nextcloud running on your Ubuntu system.
If you have run into any issues with getting Nextcloud running, please leave a comment below.
Be sure to check out our many other Ubuntu tutorials to see what else you can do with this software.