In the latest issue of HackSpace magazine, out now, editor Ben Everard shows you how to keep safe while cycling in the dark by adorning your rucksack with a billion blinkies.
This writer cycles to the workshop every day. At around the start of November every year it takes a dramatic turn for the dark. Gone are the glorious summer days of cycling home while the sun is still high in the sky. Gone, too, are the glorious early autumn days of the sun gently setting and lighting up the sky in hues of orange and pink. Now it’s time for the dark winter days, and if there are going to be some glorious lights, we have to provide them ourselves. And provide them we will.
Regular readers will be familiar with our yearly quest to bring some blinkenlights to the Bristol to Bath cycle path. Here’s the basic problem we’re trying to solve. Bike lights are great. They let cyclists be seen in the dark. However, a single point of light isn’t a great indicator of position or speed, and it requires drivers to use a degree of awareness that seems beyond some of the denizens of the road.
Bike light manufacturers have attempted to solve this problem in a few ways. Brighter lights help up to a point – beyond that just become dazzling (a particular problem on a dark bike path). Flashing lights help a little. Some lights are a little larger, and these can help significantly. However, there’s a limit to how big you can make a bike light. So, rather than attempting to enlarge a light, we’ve attempted to illuminate our largest item, this author’s cycling rucksack.

For the last couple of years, we’ve had lights on the back of the rucksack. Originally, these were a simple string of battery-powered fairy lights from the sadly defunct Wilkos. Then we upgraded these with a strip of WS2811 lights (we preferred the form factor of these waterproof string lights to anything available using the smaller WS2812B LEDs). This helps us remain visible from behind, but we’ve never been too happy with the visibility from the front. We’ve tried LEDs attached to the bike, but this has always been unsatisfactory. They get knocked about more than LEDs on the rucksack, and they’ve never lasted long.
This year, we wanted to up our visibility by attaching LEDs to the front as well, and the only front-facing part of the rucksack – the shoulder straps.
Attaching the LEDs is only half the battle, though. We also need to control them, and fortunately, there are a couple of things that have made it easier to run multiple animations from a single microcontroller.
The first is NeoPXL8, a library that outputs data to up to eight strings of LEDs simultaneously, and LED animations, which is a module that does exactly what it says. Both of these have been developed by Adafruit and work with CircuitPython on Raspberry Pi Pico.

The first step in getting these modules to work is to download both CircuitPython for Pico and the Library Bundle from circuitpython.org. You can flash CircuitPython to Pico by holding down the BOOTSEL button and plugging it into your computer via USB. You can release the BOOTSEL button once it’s plugged in. There should be a new USB drive that appears – drag and drop the UF2 file for CircuitPython that you’ve just downloaded. Once this has been copied over, the USB device should disappear and a new one called CircuitPython will appear.
Unzip the CircuitPython Library Bundle, and you need to copy across adafruit_neopxl8 and adafruit_led_animations into the lib folder on the CircuitPython USB device. The Pico device should now be ready for our code.
There is a selection of animations available (and you can code your own). We selected Comet, which is pretty similar to a Larson scanner, and used the traditional red for the back and white for the front. It gives movement and light that we think is quite eye-catching, but not dazzling or distracting. We dislike lights that turn on and off sharply – we much prefer the softer introduction on this setup.
The code for all this is:
import board
import rainbowio
import adafruit_ticks
from adafruit_led_animation.animation.comet import Comet
from adafruit_led_animation.color import GREEN, WHITE
from adafruit_led_animation.group import AnimationGroup
from adafruit_led_animation.helper import PixelMap
from adafruit_neopxl8 import NeoPxl8

# Customize for your strands here
num_strands = 3
strand_length = 38
front_len = 6
first_led_pin = board.GP2

num_pixels = num_strands * strand_length

# Make the object to control the pixels
pixels = NeoPxl8(
    first_led_pin,
    num_pixels,
    num_strands=num_strands,
    auto_write=False,
    brightness=0.50,
)

def strand(n):
    return PixelMap(
        pixels,
        range(n * strand_length, (n + 1) * strand_length),
        individual_pixels=True,
    )

strands = [PixelMap(
        pixels,
        range(0,37),
        individual_pixels=True),
        PixelMap(
        pixels,
        range(38,44),
        individual_pixels=True),
        PixelMap(
        pixels,
        range(76,83),
        individual_pixels=True)
        ]

# For each strand, create a comet animation of a different color
animations = [
    Comet(strands[0], speed=0.02, color=RED, tail_length=10, bounce=True),
    Comet(strands[1], speed=0.05, color=WHITE, tail_length=3, bounce=True),
    Comet(strands[2], speed=0.05, color=WHITE, tail_length=3, bounce=True),
]

# Advance the animations by varying amounts so that they become staggered
for i, animation in enumerate(animations):
    animation._tail_start = 30 * 5 * i // 8  # pylint: disable=protected-access

# Group them so we can run them all at once
animations = AnimationGroup(*animations)

# Run the animations and report on the speed in frame per second
t0 = adafruit_ticks.ticks_ms()
frame_count = 0
while True:
    animations.animate()
    frame_count += 1
    t1 = adafruit_ticks.ticks_ms()
    dt = adafruit_ticks.ticks_diff(t1, t0)
    if dt > 1000:
        print(f"{frame_count * 1000/dt:.1f}fps")
        t0 = t1
        frame_count = 0
This is almost the example code for NeoPXL8 (Thanks, Jeff Epler), but with a few changes to make it work how we want.
The pixels object is very similar to one created with the usual NeoPixel library. It’s a one-dimensional list with the first strip taking up places 0–37 (in our case), then the second 38–75, etc. The slight confusion here is that our strips aren’t all the same length. We have a single strip of 38 pixels, then two strips of six pixels. The NeoPXL8 library can’t handle this, so it sets every strip up as 38 pixels and we have 32 ‘phantom’ pixels in the second and third strips. This doesn’t cause us any problems – we just have to ignore them.
We don’t want to address all our pixels as one list, and we want to interact with the three strips individually. Fortunately, there’s the PixelMap object for this. We can use this to divide up our pixels object into the three strips (and we can also discard the phantom pixels). This is what the strands list is – a list of three objects, each of which is an LED strip.
That’s the setup done; let’s now start with the animations. The LED Animations module contains a series of different animations (as well as a framework you can use for building your own animations). In our case, we’ve used three Comet animations.
The three animations can be bundled together into an animations group. This makes it a bit easier to update and run them. Finally, we just need to repeatedly call the animate method of the group repeatedly, and this will run our animations.
Let’s Build
That’s the code. Now let’s take a look at the physical setup.
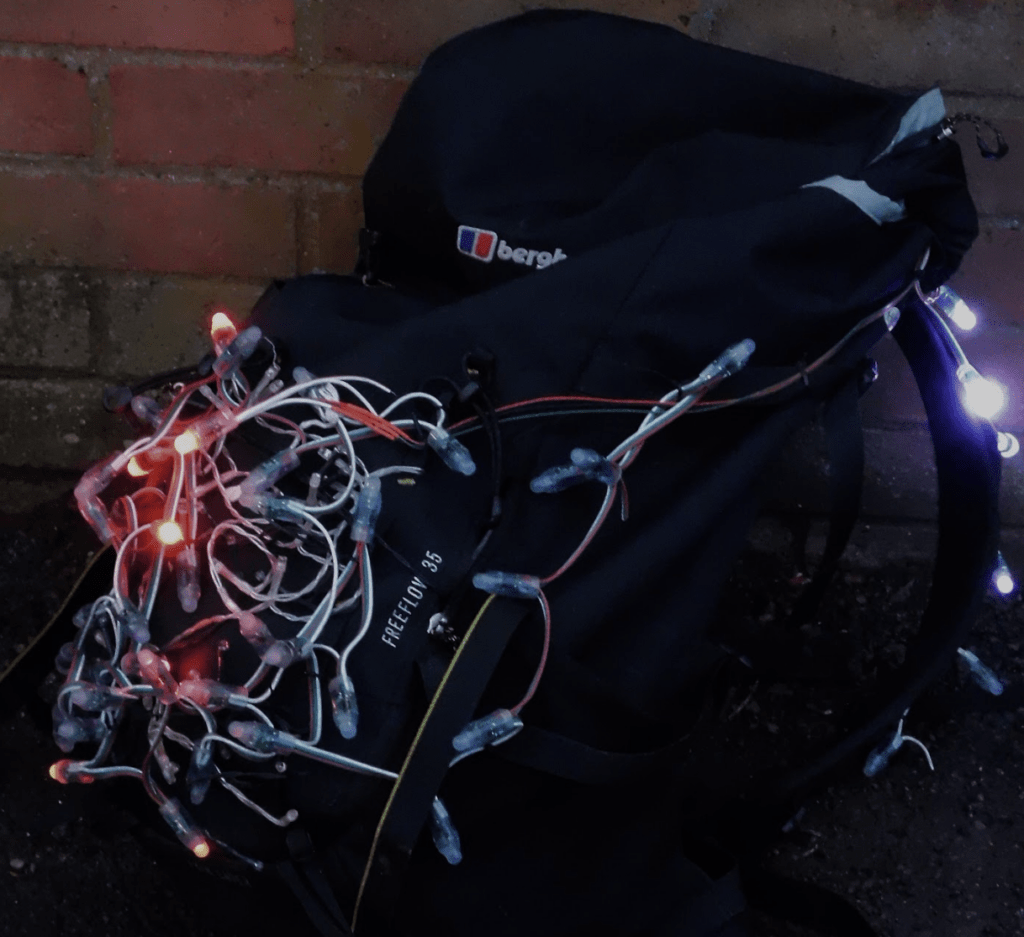
Like many rucksacks aimed at people who do outdoor activities, this one comes with a wide range of superfluous bits sewn into it. We’re not sure exactly how the good people of Berghaus intend people to use the ice axe loops that are too small for any ice axe we’ve ever seen, but they are handy for attaching LEDs to. We cable-tied the LED chain to every extraneous bit we could see. It’s in a bit of a jumble – this is intended as it gives more of a ‘cluster of light’ effect than a more mathematical layout might.
As mentioned, there are three separate strips, each of which is wired to a different pin. We have to solder them all up. You can use whatever GPIO pins you like, but they must be consecutive (we used 2, 3, and 4). Pico has enough ground pins, so we don’t have to do any creative wiring there, but we do have to connect the VIN pins of each strip together and then to the single VBUS pin. We joined all three wires together with a big drop of solder and a lot of electrical tape (we don’t have heat-shrink the right size for this).
The main thing you need to think about with construction is strain relief and minimising the likelihood of tangles. We want this to last a long time, and it’s going to get knocked about as bags tend to do. The main thing we’ve used is cable ties. A small cable tie through the mounting hole on Pico can hold wires in place and stop them from flexing at the soldered joint (which is the most likely place to fail). Cable-tying wires together and in place as much as possible will help keep things tidy (and therefore safe and working).


It remains to be seen if your setup will prove robust enough. There’s definitely more bending on the new front wires than there has been on the back. That’s just an unavoidable part of where they’re placed. If it breaks, we’ll fix it and introduce a bit more robustness then.
Finally, we need a power supply, and for this, we just use a USB power bank in the rucksack.
We’re happy with the new setup, and it seems the good people of the West of England are, too. We get regular comments from fellow cyclists on our look.
HackSpace magazine issue 74 out NOW!
Each month, HackSpace magazine brings you the best projects, tips, tricks and tutorials from the makersphere. You can get HackSpace from the Raspberry Pi Press online store or your local newsagents.


